Hi friends! It's been a long long time since I posted anything here, I'm sorry! This winter just kinda... happened. It seems to happen every winter, I turn around and two or three months have gone by, just like that. I didn't create anything for the 2nd challenge, Blue, and then I'd been wanting to get a hand-sewn curtain-along robe anglaise off of my sewing pile, plus the con I needed my Tauriel cosplay for was coming up really quickly, so I'd mostly just been letting myself work without the pressure of keeping up with posting. But I still reading my blogroll daily! I've been keeping on all of your fabulous creations, and y'all are just so inspiring :)
I had no idea what I was going to make for the third challenge, Stashbusting. My stash is relatively small but it's still pretty substantial. I'm wanting to get it organized, but that will have to wait for awhile yet. I need more space and/or different storage options to get through it.
Then I realized that I'd already made something that would work! Hooray! I'm sorry this post is so late, and that I don't have more pictures to go with it. I'll do a post on just the details in the future, promise :3
There was a ball scheduled for February 28th. I had decided not to make anything new under pressure as I already had 2 gowns I'd made in 2013 that haven't even been worn yet. But then...
Timeline:
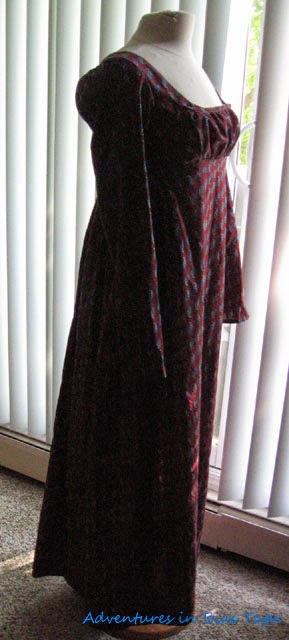
February 25th: See a lovely red gown that appears to have been made from a sari. Think, wait, I have a sari in my stash... Pull it out, work out a cutting layout, start cutting the sari into sections, cut the bodice, cut off one the bands from the skirt section. Pull out lining material to press it, run out of energy.
February 26th: run some errands, no sewing.
February 27th: Press lining fabric, cut out, start work on the bodice. Cut out sleeves. Go to bed.
February 28th: Wake up ridiculously early. 7-10am, work on bodice sleeves and bands, add buttonholes, prepare skirt. 10am-1pm, dance class. 1-2:30pm, make and attach skirt. 2:30-3pm, eat lunch. 3pm, go to Nicole's house to finish preparing. 3:30-7pm: attach buttons, make 3 reticules, get ready, leave for ball. 8pm: arrive really really late. Have a great night anyway.
It was a few weeks later, when I saw another participant's entry and the added "Stashed for?" line for this challenge that I realized that this dress COMPLETELY counts. I've had the sari for a long time, and the buttons used to close it are "vintage" (I've had them for 15 years, I have no idea how long they'd been stashed before that). Even though the lining fabric is relatively new, having been purchased in September, it was really my only option, as most of my stash is in various shades of blue or green, and I had purchased it without another project in mind.
This fabric has been in my stash for nearly 10 years, and has finally found it's purpose. And I am THRILLED, because it looked AWESOME. I cut the bodice with the crossed edge along the border, used one border from the skirt as the hem, and cut the other one off to use as bands for the bodice and sleeves. I am SO pleased with how this came out, and having a new dress for the ball was also excellent :D
The Challenge: #3: Stashbusting
Fabric: polyester sari (approx 5m long, still have the heavily decorated end and some short pieces), cotton sheeting for lining
Stashed for?: Sari 9.5 years, lining 6 months, buttons unknown (at least 15 years)
Pattern: La Mode Bagatelle cross-over dress, Sense and Sensibility sleeves
Year: 1810s-ish
Notions: 4 vintage buttons, thread
How historically accurate is it?: the overall look is pretty good, but that's about it lol
Hours to complete: 6-8
First worn: February 28th
Total cost: $4 (lining material purchased at $0.99/m)
Showing posts with label regency. Show all posts
Showing posts with label regency. Show all posts
Friday, April 24, 2015

Sunday, August 17, 2014
HSF '14: #15 The Great Outdoors: A Regency Spencer

I really like having the challenges posted well in advance, allowing for planning. And procrastinating. And changing my mind because I procrastinated too long. (Have you noticed a theme yet?)
Initially, I wanted to make a riding habit. But I'm not yet confident in my 18th century sewing to have tackled a habit without a pattern. I finally did make a mock-up, but the fit was just awful. I need to spend a lot more time on it, but I don't have a ton of motivation to do so right now.
Lucky for me, sometimes inspiration strikes early and then sits. Case in point: this spencer. I was taken with the idea some months ago: I simply HAD to make a blue cotton velveteen spencer. I HAD to. I found the mockup I'd made ages ago (roughly 3 years ago) and the fit was still good, so out came the pattern and the blue velveteen. In quite short order, I had a jacket. I'm not totally sold on the pale lining (but it's growing on me! A lot!), but I'd already put the sleeves in. Maybe some decorative braiding some such will help perk it up. And of course, I had it finished to the point of closures and sleeve hemming, and tossed it aside in favour of something else. (Carefully. My cat is mostly grey but his fur is banded with white and black too. It clings to and shows up on EVERYTHING.)
I really need to stop doing that.


But then it worked out that since I couldn't finish the habit without rushing, and a spencer would be worn outside, especially with long sleeves... Ta da! It got finished :) It did take a bit longer than I was hoping it to. I came home Friday with the intent to finish it that night, but instead I washed and stored a whole bunch of veggies pulled from a friend's garden (we both came home with about 6 shopping bags of produce, and there's tons more to be harvested :D) and then the next day I woke up with a plague and spent the whole day pretty much sleeping. But today I feel much better, and finished it.
I also ended up hand-stitching the outside seams in place. It was pretty much impossible to photograph (I tried) but the layers wanted to bag out and wouldn't lay flat. Perhaps a good pressing would have done the trick, but I've never had luck with pressing velveteen, even with a towel underneath to protect the pile. I didn't always manage to keep the pale thread from showing on the outside, but hopefully the pile of the velveteen will keep it hidden :) It lays MUCH flatter now.

The Challenge: #15 The Great Outdoors
Fabric: dark blue cotton velveteen
Pattern: Sense and Sensibility Spencer Jacket
Year: 1810s?
Notions: 4 buttons, thread
How historically accurate is it?: In shape only, most likely. Cotton velveteen might be OK, but polyester lining and plastic buttons sure aren't ;)
Hours to complete: I didn't keep track. 6 or so.
First worn: Not yet (too hot!)
Total cost: The velveteen and buttons were gifted to me, and I used maybe 1/2 metre of the cream faux-silk that I got for $2/m... so about $1.

Tuesday, August 5, 2014
Regency Paisley Cotton Day Dress Bonus!!
My sister got married this past weekend at her now-husband's farm, and I had invited my friend with me to attend. Since I had just finished my day dress, and my friend had expressed interest in playing with her DSLR camera more to learn how to use it, I asked her to take some pictures of my dress. I quickly sewed up a chemisette (also from the La Mode Bagatelle pattern) to take with me. I didn't have a chance to hem the ruffle, though you can't really see it in these photos. I feel like my expressions are a bit odd in the photos, and you might notice my SUPER historically accurate chipped nails and flip flops (it was at least 30C and 60% humidity on all the days we were there. I sacrifice footwear when it's that hot. Please understand we spent 6 full months at or well below freezing last year! This kind of heat is just not what I'm used to!). But I hope you enjoy them anyway :)

Photo by EJ Harrison

Photo by EJ Harrison
Friday, August 1, 2014
HSF'14: #14 Paisley & Plaid: Regency Day Dress

There was a bit of excitement in my city this past week! While I am very positive I am not the only historical fashion enthusiast in town, I wasn't sure how to go about finding other people. I have a partner in crime who is quite happy to make dresses and wear them out with me, but we have a hard time getting together sometimes. I am not really interested in the focus groups, and I just don't have the energy to work up to creating a group myself (though I may still have to). Then, we found out that someone in our city is very passionate about Regency and is holding a ball in September! My partner in crime was THRILLED and has leapt into wardrobes with both feet. As it happened, I had a Regency gown planned for the Paisley & Plaid challenge, so I spent the night at her house where we had the unusual but enjoyable experience of making a pair of dresses from the same pattern. Within a 24 hour period, we both had dresses that were only in need of a few finishing touches, such as hems. I finished my dress the next day when I would normally be tempted to let it sit and then finish it right before I wanted to wear it. Sure does feel good to finish something, though!
I feel the need to tell you, lovely readers, that I have never liked paisley. I was probably in my early teens, and a lot of the linens I'd received from my grandparents (being hand-me-downs from the 70s, probably) had these horrible (I thought) paisley prints on them. E-yeuch! And even up until a few months ago, I hated paisley. What an awful motif, I thought. Well, while I'm still not a huge fan, when my mum's stash was available for picking and some paisleys in not-horrible-70s-prints came out, I knew I had a paisley challenge coming up, and I grabbed them for my own stash.


I'd wanted to try the La Mode Bagatelle pattern for some time. I liked that it was a complete wardrobe from the skin out, and was eager to see how it went together. My partner in crime was just finishing a bodiced petticoat as I arrived, and after a bit of pattern tracing, fabric choosing and washing, and supper, we cut our fabrics. I had to make a mock-up bodice, which I then used as the lining.

My partner in crime leapt into the construction with both feet, while I took the time to read the directions, sometimes several times over. I did not find them to be the clearest directions, so if you use this pattern and like to read directions, take the time to read them carefully. Despite that discrepancy in our working styles, we progressed at about the same rate.

We both felt that the band was a great idea, giving the bodice a bit more support to sit under the bust, rather than having the skirt start falling from the same place. We also felt that it was just a little too long, and cut ours shorter to better suit our tastes. I waited to gather my bodice until the false bib was in place, rather than gathering the layers individually. Before attaching the skirt, we added on our sleeves. I know she had to play with the size of the band to achieve the look she wanted, and I ended up taking mine in a bit well after the rest of the dress was completed (but before it was hemmed). After that, it was just attaching the skirt - she kept hers with a flat front and gathered in the back, I pleated mine starting at the edges of the false bib with most of the fullness concentrated at the back.

I took my dress home with only closures, hemming, and finishing the false bib to finish. It was a very productive day! We got through an entire season of Doctor Who as we sewed. And I probably could have pushed a bit harder and had it finished the same day I took it home, but in the end, I worked on it slowly and finished it the day after. Which is still good, I usually wait much longer to finish a dress! I really can't wait to wear this out somewhere :)

What the item is: Regency Cotton Day Dress
The Challenge: #14 Paisley & Plaid
Fabric: 4m of cotton paisley print (60" wide).
Pattern: La Mode Bagatelle false bib-front round gown with long sleeves
Year: 1810s?
Notions: thread, ribbon, self-covered buttons
How historically accurate is it? Probably not very. Fabric content, sure, pattern, maybe. Mostly machine sewn, with hand-finishing on the hems.
Hours to complete: A season of Doctor Who, including patterning.
First worn: Not yet, but hopefully soon!
Total cost: The fabric was from my mum's stash (so free to me), a bit of ribbon and broadcloth from my partner in crime's stash, three button bases left over from my last Regency dress that I got on sale... I'm just gonna call this one free :D (Oh, I will need to buy a bit of tape for the band facing, so it'll be around $1)
And a preview of it being worn! (Apologies for the bathroom selfie and cropping out my laundry-day hair. I broke my full length mirror a few weeks ago. Epic sad-face!)

Friday, August 2, 2013
HSF: Challenge #2 - UFO: A Pair of Regency Gowns
I'd missed the deadline for the first challenge, so on January 15th, I was SUPER GUNG-HO EXCITED to start #2. I have a box in my sewing room JUST for UFOs (UnFinished Objects). Most of them are in the same general state of unfinished-ness, which is largely hemming. I headed downstairs and picked out a dress, and hemmed it. Yes! But it seemed like such a cop-out, since it was all done except for the hem, so I pulled out a couple more dresses to finish.
And then... I got the plague. I got two plagues, actually. I got over one (I think a stomach flu), felt OK for a day, and then promptly got another one (tonsilitis).
And THEN I discovered how adorable Korean boybands are, and I lost all of my free time to Youtube, but that's a post for a different blog ;)
Fast forward to the end of May. I saw my heterosexual life partner/historical costuming partner-in-crime and realized that we only had about 6 weeks to plan the Second Annual Canada Day Regency Picnic (which, in the end, didn't happen). I thought about what I was going to wear. I had recently received some lovely hanky-weight linens in greens as a birthday gift. Oh, I thought, I would make a long-sleeved Regency gown out of that. Then I remembered how I'd gone to my aforementioned partner-in-crime's house sometime last year and mostly-constructed a long-sleeved gathered-front Regency dress out of embroidered pink linen that was completely done except for the gathering ties, so I went and got it out of the pile and finally managed to get the ties threaded through the channels. I figured I can still submit it, since I'm super-late on all of the challenges so far, I'm submitting in the spirit of the challenge, and I'm not submitting it for more than one entry. Right?
The Challenge(s): Challenge #2 - UFO
Fabric: mint-and-green striped cotton; embroidered (poly) pink linen
Pattern: Mint: Sense and Sensibility's Elegant Lady's Closet cross-front gown; Pink: Simplicity 4055
Year: Mint: early-1800s; Pink: 1810-ish
Notions: pins, ribbon
How historically accurateis it are they? maybe 75%. All seams are machine-sewn, the fabrics are not strictly correct (linen, probably. The poly embroidering on it? Not so much).
Hours to complete: I don't even know at this point. Both of them languished for 6 months minimum before finishing, but given the general ease with which the patterns make up, not more than 12 hours each.
First worn: Neither has been worn yet.
Total cost: The mint fabric was about $25, and the pink linen was about the same. All the other materials needed came from my stash, so including thread and the like, $60 for both :)

And then... I got the plague. I got two plagues, actually. I got over one (I think a stomach flu), felt OK for a day, and then promptly got another one (tonsilitis).
And THEN I discovered how adorable Korean boybands are, and I lost all of my free time to Youtube, but that's a post for a different blog ;)
Fast forward to the end of May. I saw my heterosexual life partner/historical costuming partner-in-crime and realized that we only had about 6 weeks to plan the Second Annual Canada Day Regency Picnic (which, in the end, didn't happen). I thought about what I was going to wear. I had recently received some lovely hanky-weight linens in greens as a birthday gift. Oh, I thought, I would make a long-sleeved Regency gown out of that. Then I remembered how I'd gone to my aforementioned partner-in-crime's house sometime last year and mostly-constructed a long-sleeved gathered-front Regency dress out of embroidered pink linen that was completely done except for the gathering ties, so I went and got it out of the pile and finally managed to get the ties threaded through the channels. I figured I can still submit it, since I'm super-late on all of the challenges so far, I'm submitting in the spirit of the challenge, and I'm not submitting it for more than one entry. Right?
The Challenge(s): Challenge #2 - UFO
Fabric: mint-and-green striped cotton; embroidered (poly) pink linen
Pattern: Mint: Sense and Sensibility's Elegant Lady's Closet cross-front gown; Pink: Simplicity 4055
Year: Mint: early-1800s; Pink: 1810-ish
Notions: pins, ribbon
How historically accurate
Hours to complete: I don't even know at this point. Both of them languished for 6 months minimum before finishing, but given the general ease with which the patterns make up, not more than 12 hours each.
First worn: Neither has been worn yet.
Total cost: The mint fabric was about $25, and the pink linen was about the same. All the other materials needed came from my stash, so including thread and the like, $60 for both :)

Saturday, June 30, 2012
A Regency Bonnet
Hello again after a long hiatus! I've been working on small projects here and there but nothing major, and now I finally have a project worth posting for you :)
A couple weeks ago, as we drove down to a local museum, we decided that we should go watch the Canada Day fireworks. I was pretty sure I would be working until early evening, but that doesn't matter much in Edmonton. The fireworks don't start until 11pm, because it's not dark enough until then to appreciate them.
We thought we'd head downtown a little early and have a picnic first. I cannot remember how picnic attire came up but it did. "What does one wear to a Canada Day picnic?" we asked ourselves. "A Regency dress, of course!" I declared.
There was a brief pause. "BEST IDEA EVER!" we said.
I already had a dress made, complete except for a hem. My companions did not, but the dresses are so easy to put together it doesn't take long. I briefly pondered making a new one in the two days before the event, but decided that I made such a fuss over getting my current dress hemmed that I wouldn't give myself the extra stress.
But now I have a new worry. Head coverings. Up until probably the 1960s, no one left the house without some kind of covering on your head. It simply Was Not Done. Not that anyone but us will care that our heads are bare, but we're already going with historical underpinnings and dresses, why not add that one extra layer and have our heads covered too?
I used this tutorial at Simplicity.com to modify a hat I purchased at Walmart into a bonnet. It has a straw brim and a baseball-style crown which I can wear perched on the back of my head and tied beneath my chin for a reasonably close historical look. The crown needed covering, and I had to add ties of course. I used some scrap satin and ribbon, and overall I'm quite pleased with the finished product :) It took around 2 hours to make, and had a total cost of approximately $15.
Tuesday, September 27, 2011
A Regency Chemise: Completed
Once I'd unpicked the sleeve from the neckhole, it was pretty simple to finish. The gussets are wonderful. I serged all my raw edges to prevent fraying but ran out of thread on one of the loopers and of course had no replacement cones (if you have a serger you know exactly what this feels like...). I made the bias tape neckline a bit on the narrow side by sewing it with a 3/8" seam, when it should have been 1/4", but I was too lazy to pick it out. It'll do. The nice thing about bias tape is that it doesn't fray :)
Aside from stitching the hem, it's done! I may not do that until much later in the future. It's serged, and it'll be under the dresses where no one will ever see them.
On to the pictures!
Aside from stitching the hem, it's done! I may not do that until much later in the future. It's serged, and it'll be under the dresses where no one will ever see them.
On to the pictures!
Sunday, September 11, 2011
A Regency Chemise: Trial and Error
My mother and I were going to make Regency (pre-1811) gowns to wear to Worldcon in Reno this summer. We started planning this in 2009. She finished hers; I did not. I already have the gown made (from cotton; complete except for the hem) and the stays (from cotton and... mystery fabric), because I figured a chemise is a chemise and I would make one when I got around to it. Two years later, I'm bit more of a stickler for proper foundation garments, and it was time to make a Regency chemise.
A chemise, or shift, is essentially a T-tunic with varying neckline and sleeves, depending on the time period. It was pretty standard wear for everyone up into 20th century, I'd wager. You wore it against your skin, and it was almost always white. It was easier to remove and wash and bleach your chemise on laundry day rather than your whole wardrobe. Consider, before the advent of the washing machine, you had to scrub and beat your clothing to get the dirt out, and then either hang it on a line or lay it on the ground to dry. Not a fun prospect if you had numerous outfits.
I picked up a medium-weight linen-cotton blend to make the chemise. I love linen to itty bitty pieces; it's a wonderful fabric that is so easy to work with, even if the cut edges tend to fray. And the best part is, it's all natural, made from flax, and breathes wonderfully. Linen is a supremely comfortable fabric.
I'm using Sense & Sensibility's Regency undergarments pattern. This is extra challenging because I've lost the instructions. The pattern itself is very simple: a front, a back, a rectangle for the sleeves, a square cut on the bias for underarm gores, and the width of fabric needed to make self-bias binding for the neckline. I am unsure how deep the hem is, and if I bind the sleeve edges or turn them under.
I've worked with underarm gores before, but I got a little confused on this one. The gore was marked with notches on two sides, corresponding to notches on either end of the sleeve rectangle. The mid point of the sleeve matches the shoulder seam of the body pieces, and the bottom point of the gore will attach to the body to give the arms room to move. It should have been straightforward.

The sleeve. At left is the point of the gore that will attach to the body.

The front neck and top of the shoulder.
As you can probably tell, I chose to sew the sleeve and gore together first, rather than attach the sleeve to the body while both lay flat, and work the gore from there. I wound up attaching the sleeve to the neckline instead.

Oops...
I decided to call it a night and go to bed...
Subscribe to:
Posts (Atom)
1770's Riding Habit
I'm not precisely sure when I decided that I needed a riding habit, but once the idea was there, it needed to happen. It's been on ...

-
 Hello again dear readers! I was a bit optimistic last January when I thought I would be more productive with both sewing and writing. At som...
 -
 Phew, this gown is taking a really long time! I've been really excited to work on it all month and I have been whenever I've had fre...
 -
 I really like having the challenges posted well in advance, allowing for planning. And procrastinating. And changing my mind because I proc...